The EcoBoost Intake Project, Part 3: Airbox Design
Interested in purchasing our Mustang EcoBoost intake system? Check out more details on our product page linked below!
Mishimoto Ford Mustang EcoBoost Performance Air Intake
Last time we covered the design of our intake pipe and left you with a look at our airbox design in the form of a rendering. It's time to show you how we developed this component.
First, we started with some steel and began selecting mounting points for attaching our box. Once we found these points, we pulled out the welder and began fabricating a prototype.
Fabricating Mustang airbox

Fabricating Mustang airbox
We then constructed a lid to fully seal the filter from engine bay temperatures.

Fabricating Mustang airbox

Fabricating Mustang airbox
Now that we had a basic design, our engineering team put this into Solidworks to create the awesome 3D renderings shown below.

Mishimoto intake system rendering

Mishimoto intake system rendering
We didn't stop here! To ensure the perfect fitment of this component, we used our 3D printer to construct an actual prototype from our 3D renderings. This unit was printed in several sections and glued together. The external ribs you see running across the surface are specifically included to strengthen the plastic construction. They will not be needed in the final airbox design.

3D Printed airbox

3D Printed airbox

3D Printed airbox

3D Printed airbox
And here's the printed unit next to our drawing!

3D Printed airbox and drawing
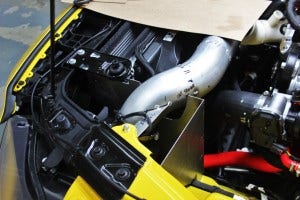
Next we installed this prototype in our Mustang to confirm fitment. Check it out!

3D Printed airbox installed

3D Printed airbox installed

3D Printed airbox installed

3D Printed airbox installed
Now that we had a functional prototype it was time for the fun part, product testing! Check back with us next time for a look at dyno testing and the results!
Thanks